Wednesday, 21 May 2014
Wednesday, 14 May 2014
Exporting a Film
Once you have completed your project, you will want to export your film, which means it will be your final cut and not just a few sequences on premiere pro.. Here is a few quick steps on how to do so; Firstly you want to click file > export media. Once you have clicked that a box will come up on the screen. You want to tick three options; 'Use Maximum rendering Quality', 'Frame Blend', Render and maximum depth'. Once you've ticked those you can change the name of your project. Now that you've done all that click export, and your movie will be exported.
Tuesday, 13 May 2014
Adding Music and Mixing sound
In Premier Pro you can add additional audio such as music or effects. Firstly, All you have to do is import whatever audio you want to use into the project. Now you will see the imported audio file listed in the 'Project' docker under 'Name'. You will now click on the audio file you have just imported and drag into your timeline to 'Audio 2'. Now if you want the audio of video covered by the audio you have just selected, click on the speaker icon (toggle track output) in Audio 1 in the timeline, this will set the audio of the video to mute and your audio will play over the video. If you want to hear both the audio you have selected and the audio of the video, all you have to do is drag a yellow line in the audio 1 track up and down. You can do this as well in Audio 2 track, after expanding, by clicking on a small arrow in the Audio 2 track.
Uploading Footage to a Computer
As you could imagine, when you're filming footage you will eventually have to upload it to a computer. This blog will show you step by step how to do so.
The first thing to do is to make a new folder so you can upload your footage to there. Then you would plug the USB into the computer then switch the camera on. Four options will come up on the camera, you must select the option 'USB connect', which is on the top left. Once all the software has been connected and installed a folder will automatically pop up giving you the option to browse all the files on the camera. Recorded footage will be in a folder called 'MP_ROOT', open that and drag and drop the footage onto your computer, open the footage you want in premier pro, it will be at the bottom left of the screen in the 'Z-drive' Then your footage has been successfully uploaded.
Thursday, 8 May 2014
Timelines
The timeline, at the bottom of the screen, is essentially the panel in which your video takes shape. When you've uploaded your footage all you do is drag the desired footage from the project panel and drop it into the timeline.
Once the footage is in the timeline you can adjust edit points, making the clip you've used shorter or longer. You can also create multiple layers of videos, such as titles or superimposed images, you can do the same with the audio. Once you've done all this you can edit the footage.
Wednesday, 7 May 2014
Adding text in Premier Pro
In Premiere Pro you can add titles or texts to your sequences. All you have to do is position your play head over the area on your timeline sequence where you want the title to start.
After that, in the menue at the top click on Title > New title > Default still. Then you would name the file for your title.
Now a box will show up with a lot of settings you can make when you create your title. The title will be displayed on the frame where you positioned your playhead. So you can see how changed you make to the title setting will look against the appropriate background.
To actually create the title, click on the 'type' tool in the tools palette on the upper-left of the screen. Then click on the main screen and type whatever you want for the title.
You can now use the settings menus to the top right to change the font, size colour of the title. You can also add other effects such as a drop shadow and strokes.
To change the position of the title on the screen click on the selection/arrow tool in the tool palette and click on the title to drag it around the screen.
Go to the 'Project' pane and you'll see the title you've just created listed as a file there. Click on it, hold down your mouse and drag the title to a video track at the position on the Timeline where you want the title to appear. Release and the title you created will be displayed on the Timeline.
That's all the steps you will need to add titles into your project, enjoy!
Adding Transitions in Premier Pro
When making a project such as a short movie, you will probably want to add transitions. Here are a few simple steps to show you to do so; (cover transitions)
1) First off you want to select the 'effects' panel on the lower left hand-side of the screen. Open the video transitions folder.
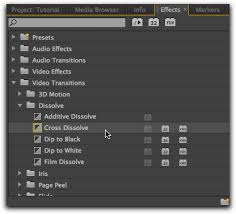 |
| These are the bins that have all the transitions in. |
2) Then you would select the type of transition you want to use. There will be different transitions depending on what version of Premiere Pro you are using.
3) Once you've decided what transition you want to use, drag and drop it into your video clip panel.
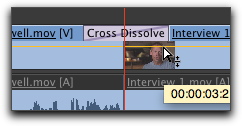 |
| This is what it looks like when you drop the transition in the desired place. |
4) Once the transition you have chosen is in the desired place (They can be placed between two overlapped clips as well as at the beginnings and endings of each clip).
5) Now you can click and drag the left and right sides of the transition, to either shorten or extend it. This is to alter the default time length of the transition. And that's the five steps you need to add transition in!
Bins
When making a project in Premiere pro, you will have to create something called 'Bins', these are basically a way to organise the contents of your project.
To create a Bin all you have to do is click the 'New Bin' Button at the bottom of your project panel. You'll notice that the bin icon is the same as a folder icon. Bins usually contain source files, sequences and even other bins. You will probably use them to store offline clips, main sequences, backup sequences and to organise file types.
Example of a bin below and how you can change the name of the bin so you can keep track of your work:
Subscribe to:
Comments (Atom)